第四章 Stable Diffusion
在前一章中,我们介绍了扩散模型及其迭代优化的基本思想。学完该章,我们已经能够生成图像,但训练模型非常耗时,而且我们无法控制生成的图像。在本章中,我们将学习如何从这一阶段走向基于文本条件的模型,这些模型可以根据文本描述高效地生成图像,研究的是一个名为Stable Diffusion(SD)的模型。不过在介绍SD之前,我们会先了解条件模型如何工作,并回顾一些产生当今文生图像模型的创新。
本文相关代码请见GitHub仓库。
增强控制:条件扩散模型
在解决从文本描述生成图像这个具有挑战性的任务之前,先聚焦于一个略简单一点的任务上。我们将了解如何引导我们的模型输出特定类型或类别的图像。可以使用一种称为条��件化的方法,其思想是要求模型生成的不是宽泛的图像,而是属于预定义类别的图像。
模型条件化是一个简单但有效的想法。我们将通过上一章使用的扩散模型,仅做一些小改动。首先,不再使用蝴蝶数据集,而是切换到一个有类别的数据集。我们使用Fashion MNIST,这是一个包含成千上万张衣服图像的数据集,每张图像都带有一个来自10个不同类别的标签。然后是关键,我们将通过模型运行两个输入。不仅向模型展示真实的图像,还会告诉它每张图像所属的类别。我们期望模型学会关联图像和标签,以理解毛衣、靴子等的自有特征。
请注意,我们并不想解决分类问题——不是希望模型告诉我们图像属于哪个类别。我们仍然希望它执行与上一章相同的任务:生成看起来像来自这个数据集的图像。唯一的区别是给了它关于这些图像的附加信息。我们将使用相同的损失函数和训练策略,因为任务是相同的。
准备数据
需要一个具有不同图像组的数据集。适用于计算机视觉分类任务的数据集是理想的选择。我们可以从类似ImageNet的数据集开始,该数据集包含数百万张涵盖1000个类别的图像。然而,在这个数据集上训练模型将花费极长的时间。在处理新问题时,最好先从较小的数据集入手,以确保一切按预期进展。这可以缩短反馈环,使我们能够快速迭代并确保方向正确。
我们可以选择MNIST作为这个例子,像上一章那样。为略显不同,我们将选择Fashion MNIST。Fashion MNIST由Zalando开发并开源,是MNIST的替代品,具有类似的特征:压缩大小、黑白图像和十个类别。主要区别在于类别对应于不同类型的衣物,而不是数字,且图像比简单的手写数字包含更多细节。
下面来看一些例子。
from datasets import load_dataset

from utils.utils import show_images

fashion_mnist = load_dataset("fashion_mnist")
clothes = fashion_mnist["train"]["image"][:8]
classes = fashion_mnist["train"]["label"][:8]
show_images(clothes, titles=classes, figsize=(4, 2.5))
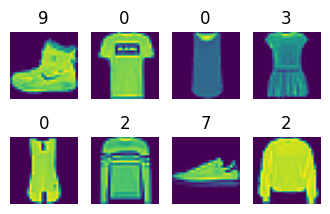
因此,类别0对应于T恤,类别2是毛衣,而类别9是靴子(Fashion MNIST的十个类别)。我们准备数据集和数据加载器的方式与上一章相似,主要的区别是类别信息也作为输入。与上一章的调整大小操作不同,这次我们会将图像输入(28 × 28像素)填充到32 × 32像素。这将保持原始图像的质量,有助于UNet做出更高质量的预测。
注:上一章中图像非常大(512,283),我们得将其缩放至更小的尺寸。
import torch
from torchvision import transforms

preprocess = transforms.Compose(
    [
        transforms.RandomHorizontalFlip(),  # Randomly flip (data augmentation)
        transforms.ToTensor(),  # Convert to tensor (0, 1)
        transforms.Pad(2),  # Add 2 pixels on all sides
        transforms.Normalize([0.5], [0.5]),  # Map to (-1, 1)
    ]
)


def transform(examples):
    images = [preprocess(image) for image in examples["image"]]
    return {"images": images, "labels": examples["label"]}


train_dataset = fashion_mnist["train"].with_transform(transform)

train_dataloader = torch.utils.data.DataLoader(
    train_dataset, batch_size=256, shuffle=True
)
创建类别条件模型
diffusers库中的UNet允许提供自定义条件信息。在这里,我们创建一个与上一章中使用的模型类似的模型,但在UNet构造函数中添加了一个num_class_embeds参数。这个参数告诉模型我们希望使用类别标签作为额外条件。我们将使用10,因为这是Fashion MNIST中的类别数。
from diffusers import UNet2DModel

model = UNet2DModel(
    in_channels=1,  # 1 channel for grayscale images
    out_channels=1,
    sample_size=32,
    block_out_channels=(32, 64, 128, 256),
    num_class_embeds=10,  # Enable class conditioning
)
要使用这个模型进行预测,我们必须将类别标签作为额外输入传递给forward()方法:
x = torch.randn((1, 1, 32, 32))
with torch.no_grad():
    out = model(x, timestep=7, class_labels=torch.tensor([2])).sample
out.shape
torch.Size([1, 1, 32, 32])
注:我们还将另一样参数作为条件传递给模型:时间步!没��错,即使是上一章中的模型也可以视作一个条件扩散模型。根据时间步对其进行条件化,期望了解我们在扩散过程中的进展程度将有助于生成更真实的图像。
在内部,时间步和类别标签会被转换为模型在前向传播过程中使用的嵌入。在UNet的多个阶段,这些嵌入会被投射到与给定层中的通道数匹配的维度。然后,这些嵌入会被添加到该层的输出中。这意味着条件信息会被传递到UNet的每个块中,给模型充分的机会来学习如何有效地使用它。
训练模型
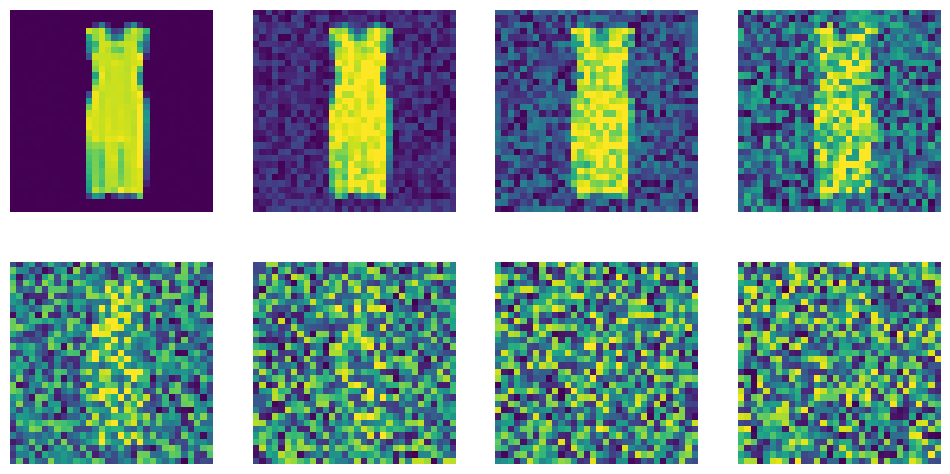
在灰度图像上添加噪声与上一章的蝴蝶图像效果一样好。来看看在更多噪声时间步时噪声的影响。
from diffusers import DDPMScheduler

scheduler = DDPMScheduler(
    num_train_timesteps=1000, beta_start=0.0001, beta_end=0.02
)
timesteps = torch.linspace(0, 999, 8).long()
batch = next(iter(train_dataloader))
x = batch["images"][0].expand([8, 1, 32, 32])
noise = torch.rand_like(x)
noised_x = scheduler.add_noise(x, noise, timesteps)
show_images((noised_x * 0.5 + 0.5).clip(0, 1))
我们的训练方式也几乎与上一章相同,只是现在传递类别标签作为条件。注意,这只是为模型提供的附加信息,并不影响定义损失函数的方式。开启训练,可以泡杯茶、咖啡或其他饮料。
注:我们还将使用Python包tqdm在训练过程中显示进度。作者忍不住分享他们文档中的这句话(https://tqdm.github.io):
tqdm在阿拉伯语中意为“进展”(taqadum, تقدّم),在西班牙语中是“我非常爱你”(te quiero demasiado)的缩写。
不要被下面的代码吓到:它与我们进行无条件生成时的类似(建议将这段代码与上一章的代码进行对比。你能找到所有的不同之处吗?)。
- 加载一批图像及其相应的标签。
- 根据时间步为图像添加噪声。
- 将带噪声的图像和类别标签喂给模型。
- 计算损失。
- 反向传播损失并用优化器更新模型权重。
注:epoch和学习率的数量不同、AdamW的epsilon不一样,还使用了_tqdm加载数据、标签并将标签传递给模型。最重要的是条件为2-line diff。
from torch.nn import functional as F
from tqdm import tqdm

scheduler = DDPMScheduler(
    num_train_timesteps=1000, beta_start=0.0001, beta_end=0.02
)

num_epochs = 25
lr = 3e-4
optimizer = torch.optim.AdamW(model.parameters(), lr=lr, eps=1e-5)
losses = []  # Somewhere to store the loss values for later plotting

device = torch.device("cuda:0" if torch.cuda.is_available() else "cpu")
model = model.to(device)

# Train the model (this takes a while!)
for epoch in (progress := tqdm(range(num_epochs))):
    for step, batch in (
        inner := tqdm(
            enumerate(train_dataloader),
            position=0,
            leave=True,
            total=len(train_dataloader),
        )
    ):
        # Load the input images and classes
        clean_images = batch["images"].to(device)
        class_labels = batch["labels"].to(device)

        # Sample noise to add to the images
        noise = torch.randn(clean_images.shape).to(device)

        # Sample a random timestep for each image
        timesteps = torch.randint(
            0,
            scheduler.config.num_train_timesteps,
            (clean_images.shape[0],),
            device=device,
        ).long()

        # Add noise to the clean images according to the timestep
        noisy_images = scheduler.add_noise(clean_images, noise, timesteps)

        # Get the model prediction for the noise - note the use of class_labels
        noise_pred = model(
            noisy_images,
            timesteps,
            class_labels=class_labels,
            return_dict=False,
        )[0]

        # Compare the prediction with the actual noise:
        loss = F.mse_loss(noise_pred, noise)

        # Display loss
        inner.set_postfix(loss=f"{loss.cpu().item():.3f}")

        # Store the loss for later plotting
        losses.append(loss.item())

        # Update the model parameters with the optimizer based on this loss
        loss.backward(loss)
        optimizer.step()
        optimizer.zero_grad()
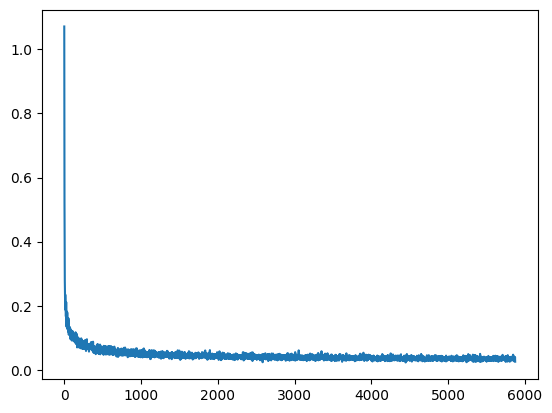
import matplotlib.pyplot as plt

plt.plot(losses)
采样
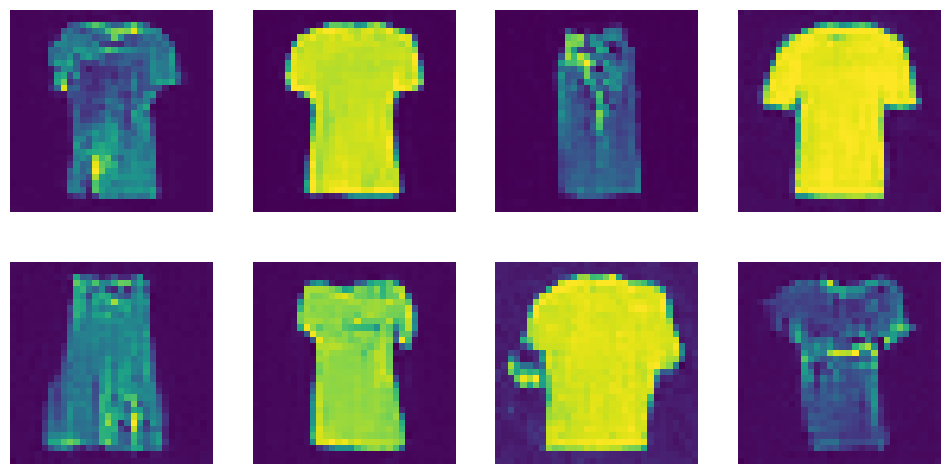
现在有了一个在做预测时需要两个输入即图像和类别标签的模型。可以通过从随机噪声开始,然后逐步去噪,传入我们想生成的类别标签来创建样本:
def generate_from_class(class_to_generate, n_samples=8):
    sample = torch.randn(n_samples, 1, 32, 32).to(device)
    class_labels = [class_to_generate] * n_samples
    class_labels = torch.tensor(class_labels).to(device)

    for _, t in tqdm(enumerate(scheduler.timesteps)):
        # Get model pred
        with torch.no_grad():
            noise_pred = model(sample, t, class_labels=class_labels).sample

        # Update sample with step
        sample = scheduler.step(noise_pred, t, sample).prev_sample

    return sample.clip(-1, 1) * 0.5 + 0.5
# Generate t-shirts (class 0)
images = generate_from_class(0)
show_images(images, nrows=2)
1000it [00:13, 75.05it/s]
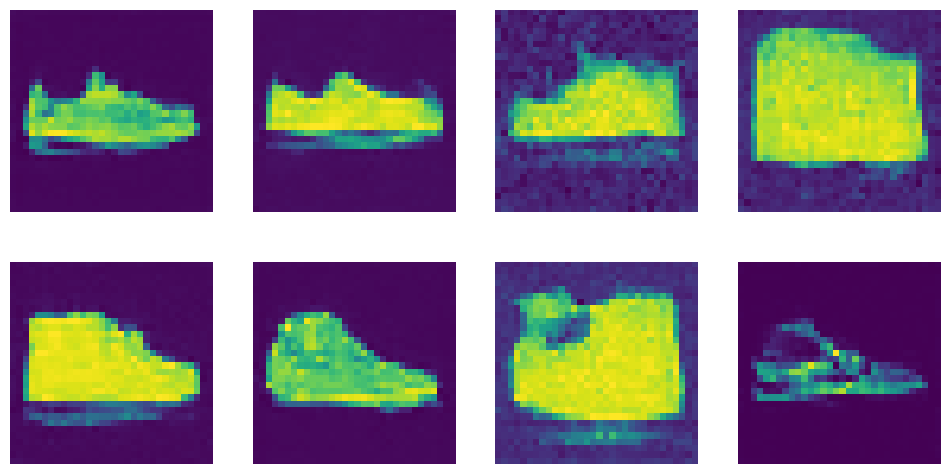
# Now generate some sneakers (class 7)
images = generate_from_class(7)
show_images(images, nrows=2)
1000it [00:13, 76.91it/s]
# ...or boots (class 9)
images = generate_from_class(9)
show_images(images, nrows=2)
1000it [00:13, 76.29it/s]
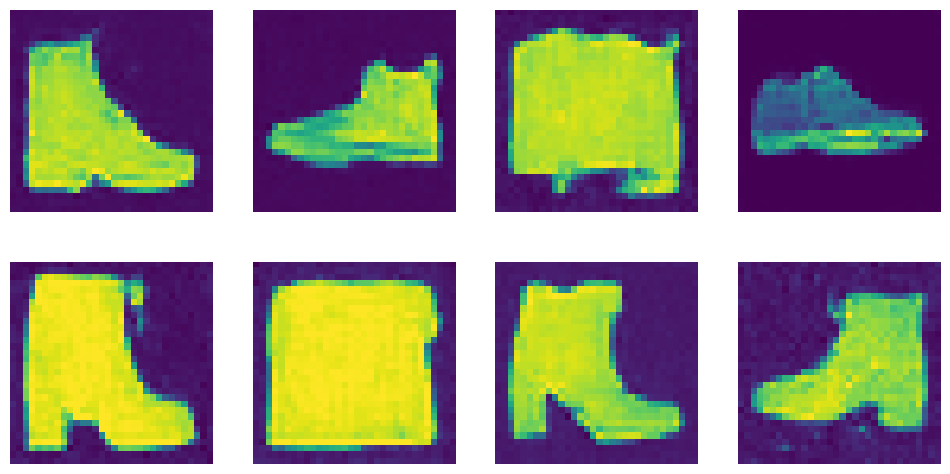
可以看到,生成的图像远称不上完美。如果进一步探索架构并延长训练时间,图像质量将大大提升。但令人惊奇的是,模型仅通过对训练数据发送这些信息,就学习到了不同类型衣物的形状,并意识到形状9与形状0不同。换句话说,模型习惯于看到数字9与靴子一起出现。当我们要求它生成图像并提供数字9时,它会生成一双靴子。
提高效率:潜在扩散
既然可以训练一个条件模型,我们需要扩展它并将条件从类别标签改为文本,对吧?……对吗?实际并非如此。随着图像大小的增加,处理这些图像所需的算力也随之增加。这在自注意力机制中尤为明显,其中运算量按输入数量的平方增长。一个128像素的正方形图像的像素量是64像素正方形图像的四倍,在自注意力层中需要16倍的内存和运算。这对所有希望生成高分辨率图像的人来说都是个问题。
潜在扩散尝试通过使用一个独立的变分自编码器来缓解这一问题。正如我们在第二章中所见,VAE可以将图像压缩到更小的空间维度。其原理是图像往往包含大量冗余信息。给定足够的训练数据,VAE可以学习生成输入图像的更小表示,然后基于这个小的潜在表示高保真地重建图像。Stable Diffusion中使用的VAE接收三通道图像,并生成四通道的潜在表示,每个空间维度的缩减因子为8。一个512像素的正方形输入图像(3x512x512=786,432个值)将被压缩为4x64x64的潜在表示(16,384个值)。
通过对这些较小的潜在表示进行扩散处理,而非对全分辨率图像进行扩散,我们可以获得使用较小图像的许多好处(较低的内存使用量,UNet所需的层数较少,更快的生成时间等),并且在准备查看时仍然可以将结果解码回高分辨率图像。这一创新大大降低了训练和运行这些模型的成本。介绍这一思想的论文《潜在扩散模型》通过训练基于分割图、类别标签和文本条件的模型,展示了这一技术的威力。优秀的结果促成了作者与RunwayML、LAION、StabilityAI和EleutherAI等合作伙伴的进一步合作,训练出更强大的模型版本,即Stable Diffusion。
注:LAION和EleutherAI是聚焦于开放机器学习的非营利性组织。StabilityAI是一家开放访问机器学习的前沿公司。RunwayML是构建针对创意应用AI驱动工具的公司。
Stable Diffusion:深入了解组件
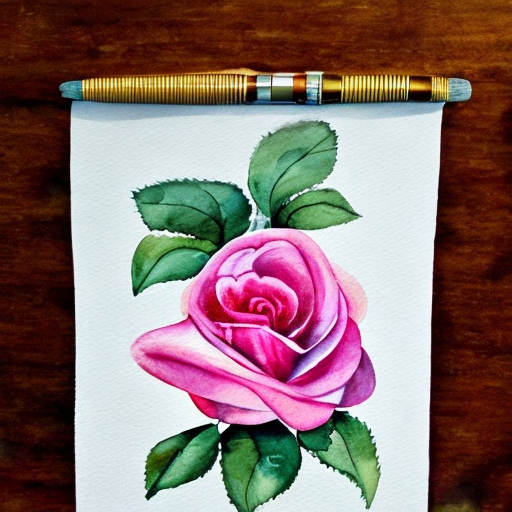
Stable Diffusion是一个基于文本条件的潜在扩散模型。由于其广受欢迎,数百个网站和应用程序上无需任何技术知识即可使用它来创建图像。它也得到了诸如diffusers等库的良好支持,这些库让我们可以使用用户友好的管道来生成Stable Diffusion图像:
from diffusers import AutoencoderKL, StableDiffusionPipeline

vae = AutoencoderKL.from_pretrained(
    "stabilityai/sd-vae-ft-ema", torch_dtype=torch.float16
).to(device)
pipe = StableDiffusionPipeline.from_pretrained(
    "runwayml/stable-diffusion-v1-5",
    vae=vae,
    torch_dtype=torch.float16,
    variant="fp16",
).to(device)
pipe("Watercolor illustration of a rose").images[0]
0%| | 0/50 [00:00<?, ?it/s]
本节将探讨驱动这一切的所有组件。
文本编码器
那么,Stable Diffusion是如何理解文本的呢?前面展示了如何通过向UNet提供附加信息,使我们能够对生成的图像类型进行一定的控制。给定一个图像的噪声版本,模型的任务是根据附加线索(如类别标签)预测去噪版本。对SD,附加线索是文本提示词。在推理时,我们输入想要生成的图像描述和一些纯噪声作为初始点,模型会尽力将随机输入去噪为与标题匹配的图像。
为实现这一点,我们需要创建一个能够捕捉文本描述相关信息的数字表示。为此,我们使用一个文本编码器,它将输入字符串转换为文本嵌入,这些嵌入会与时间步和噪声潜在变量一起输入到UNet中。

为此,SD利用了一个基于CLIP的预训练transformer模型,该模型在第二章中介绍。文本编码器是一个transformer模型,它接收一个令牌序列,并为每个令牌生成一个向量。在Stable Diffusion的早期版本(SD 1到1.5)中,使用了OpenAI的原始CLIP,文本编码器映射到一个768维的向量。由于CLIP的原始数据集未知,社区训练了一个名为OpenCLIP的开源版本,它基于来自LAION非营利组织的数据集进行训练。Stable Diffusion 2使用了OpenCLIP的文本编码器,它为每个令牌生成1024维的向量。
我们不将所有令牌的向量合并成单一表示,而是将它们分开并用作UNet的条件。这使得UNet可以分别使用每个令牌中的信息,而不仅仅是提示词的整体含义。由于我们是从CLIP模型的内部表示中提取这些文本嵌入,它们通常被称为编码器隐藏态。我们来深入了解文本编码器的工作原理。这与我们在第三章中看到的编码器模型的流程相同。

该图展示了文本编码流程,它将输入的提示词转换为一组文本嵌入(编码器隐藏状态��),这些嵌入可以作为条件输入到UNet中。
编码文本的第一步是执行标记化的。这将字符序列转换为数字序列,每个数字代表一组不同的字符。在下面的示例中,我们可以看到Stable Diffusion的分词器如何对一个短语进行标记。提示词中的每个令牌都被分配了一个唯一的令牌编号(例如,“photograph”在标记器的词汇表中恰好是8853)。还有一些额外的令牌提供附加的上下文信息,例如句子结束的位置。
prompt = "A photograph of a puppy"

# Turn the text into a sequence of tokens:
text_input = pipe.tokenizer(
    prompt,
    padding="max_length",
    max_length=pipe.tokenizer.model_max_length,
    truncation=True,
    return_tensors="pt",
)

# See the individual tokens
for t in text_input["input_ids"][0][:8]:  # We'll just look at the first 7
    print(t, pipe.tokenizer.decoder.get(int(t)))
tensor(49406) <|startoftext|>
tensor(320) a</w>
tensor(8853) photograph</w>
tensor(539) of</w>
tensor(320) a</w>
tensor(6829) puppy</w>
tensor(49407) <|endoftext|>
tensor(49407) <|endoftext|>
文本在标记化后,可以将其传递给文本编码器,以获得最终的文本嵌入,这些嵌入将被喂给UNet:
text_embeddings = pipe.text_encoder(text_input.input_ids.to(device))[0]
print("Text embeddings shape:", text_embeddings.shape)
Text embeddings shape: torch.Size([1, 77, 768])
无分类器引导
尽管做了很多努力来使文本条件尽可能有用,但模型在预测时仍然倾向于主要依赖于噪声输入图像而不是提示词。在某种程度上,这可以理解——许多标题与其关联的图像关系不大,因此模型学会了不要过分依赖描述。然而,在生成新图像时,这种情况是不可取的——如果模型不遵循提示词,我们可�能会得到与描述不相关的图像。
为解决这一问题,我们引入了引导(guidance)。引导通常是指所有提供更多控制采样处理的方法。一种可行的选择是修改损失函数以偏向特定方向。例如,如果我们想让生成的图像偏向特定颜色,可以改变损失函数来衡量我们与目标颜色的平均距离。另一种选择是使用诸如CLIP或分类器等模型来评估结果,并将它们的损失信号作为生成过程的一部分。例如,使用CLIP,我们可以比较提示文本与生成图像嵌入之间的差异,并引导扩散过程最小化这一差异。在练习部分将展示如何使用这种技术。
另一种选择是使用一种称为无分类器引导(Classifier-Free Guidance,CFG)的技巧,它结合了有条件和无条件扩散模型的生成。在训练过程中,有时会将文本条件留空,迫使模型学习在没有任何文本信息的情况下对图像进行去噪(无条件生成)。然后,在推理时我们做出两个预测:一个使用文本提示词作为条件,另一个不使用。然后,可以利用这两个预测之间的差异来创建一个最终的组合预测,根据某个缩放因子(引导比例)进一步向文本条件预测所指示的方向推进,希望最终生成的图像更符合提示词。为了引入引导,我们可以通过noise_pred = noise_pred_uncond + guidance_scale * (noise_pred_text - noise_pred_uncond)等修改噪声预测。这一小改动效果出奇地好,使我们能够更好地控制生成过程。在本章稍后将深入探讨实现细节,但先来看看如何使用它:
images = []
prompt = "An oil painting of a collie in a top hat"
for guidance_scale in [1, 2, 4, 12]:
    torch.manual_seed(0)
    image = pipe(prompt, guidance_scale=guidance_scale).images[0]
    images.append(image)
0%| | 0/50 [00:00<?, ?it/s]
0%| | 0/50 [00:00<?, ?it/s]
0%| | 0/50 [00:00<?, ?it/s]
0%| | 0/50 [00:00<?, ?it/s]
from utils.utils import image_grid

image_grid(images, 1, 4)

由提示词“An oil painting of a collie in a top hat”生成的图像,CFG比例从左到右分别为1、2、4和12
可以看出,更高的值会生成更符合描述的图像,但如果设置得太高,可能会让图像过饱和。
VAE(变分自编码器)
VAE的任务是将图像压缩为更小的潜在表示并再次重建。用于Stable Diffusion的VAE是一个非常出色的模型。我们在这里不会讨论训练细节,但除了第二章中描述的常规重建损失和KL散度外,VAE还使用了额外的基于补丁的鉴别器损失来帮助模型学习生成合理的细节和纹理。这为训练增加了类似GAN的组件,有助于避免以前VAE模型中常见的稍微模糊的输出。像文本编码器一样,VAE通常是单独训练的,并在扩散模型训练和采样过程中作为frozen组件使用。

图4-1 VAE架构
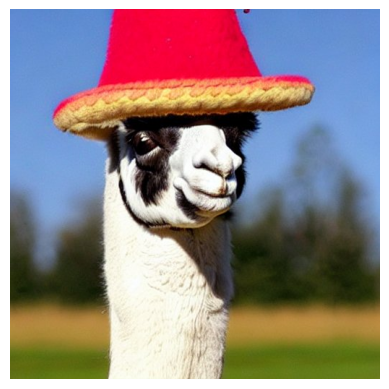
我们来加载一张图像,看看它经过VAE压缩和解压后的样子:
from utils.utils import load_image, show_image

im = load_image(
    "https://huggingface.co/datasets/genaibook/images/resolve/main/llama.jpeg",
    size=(512, 512),
)
show_image(im)
with torch.no_grad():
    tensor_im = transforms.ToTensor()(im).unsqueeze(0).to(device) * 2 - 1
    latent = vae.encode(tensor_im.half())  # Encode the image to a distribution
    latents = latent.latent_dist.sample()  # Sampling from the distribution
    # This scaling factor was introduced by the SD authors to reduce the
    # variance of the latents. Can be accessed via vae.config.scaling_factor
    latents = latents * 0.18215

latents.shape
torch.Size([1, 4, 64, 64])
# Plot the individual channels of the latent representation
show_images(
    [l for l in latents[0]],
    titles=[f"Channel {i}" for i in range(latents.shape[1])],
    ncols=4,
)

with torch.no_grad():
    image = vae.decode(latents / 0.18215).sample
image = (image / 2 + 0.5).clamp(0, 1)
show_image(image[0].float())
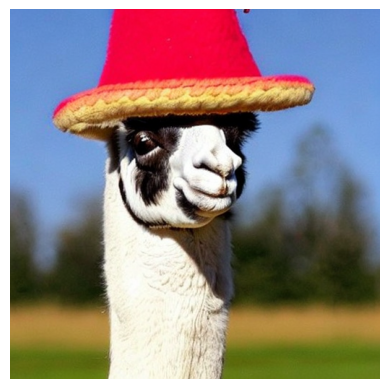
从零开始生成图像时,我们会先创建一组随机的潜在表示。通过迭代地优化这些噪声潜在表示来生成样本,然后使用VAE解码器将这些最终的潜在表示解码为可以查看的图像。只有在希望从现有图像开始处理时,才会使用编码器,这将在第7章探讨。
UNet
用于Stable Diffusion的UNet与上一章中用于生成图像的UNet类似。不同的是,它的输入不是一个三通道图像,而是一个四通道的潜在表示。时间步嵌入的输入方式与本章开始例子中的类别条件输入方式相同。但这个UNet还需要接收文本嵌入作为额外的条件。在UNet中散布着交叉注意力层,UNet中的每个空间位置都可以关注文本条件中的不同标记,从提示中引入相关信息。下图展示了文本条件(以及基于时间步的条件)在不同点的输入方式。

图4-2 UNet图示
Stable Diffusion版本1和2的UNet大约有8.6亿参数。最新的Stable Diffusion XL(SDXL)中的UNet参数更多,大约是26亿,并且使用了额外的条件信息。
Stable Diffusion XL
2023年夏天,发布了一个更好的Stable Diffusion版本:Stable Diffusion XL。它使用了本章描述的相同原理,并对所有系统组件进行了各种改进。一些最令人兴奋的变化有:
-
更大的文本编码器可捕捉更好的提示词表示。它使用了两个文本编码器的输出并将这些表示连接起来。
-
对一切进行条件化。除了携带噪声量信息的时间步和文本嵌入外,SDXL还使用了以下额外的条件信号:
- 原始图像大小。训练集中不再丢弃小图像(占用于训练SDXL的总训练数据的近40%),而是将小图像放大并在训练中使用。不过,模型也会接收关于图像大小的信息,从而学到放大伪影(upscaling artifacts)不应出现在大图像中,并鼓励在推理过程中产生更好的质量。
- 裁剪坐标。在训练过程中,输入图像通常会被随机裁剪,因为批次中的所有图像必须具有相同的大小。随机裁剪可能会产生不良影响,例如切掉主体的头部或完全移除图像中的主体,虽然可能在文本提示词中有相应描述。在模型训练完成后,如果我们请求未裁剪的图像(通过将裁剪坐标设置为
(0, 0)),模型更有可能生成居中的主体。 - 目标宽高比。在对方形图像进行初步预训练后,SDXL在各种宽高比上进行了微调,并将原始宽高比信息作为另一个条件信号使用。与其他条件情况一样,这使得生成的风景和肖像图像比以前更为真实且伪影更少。
-
更大的分辨率。SDXL设计用于生成
1024×1024像素分辨率的图像(或像素总数约为1024^2的非方形图像)。和宽高比一样,这一特性是在微调阶段实现的。 -
UNet的规模大约是原来的三倍。交叉注意力上下文变大,以适应更多的条件。
-
改进的VAE。它使用与原始Stable Diffusion相同的架构,但在更大的批次上进行训练,并使用EMA(指数移动平均)技术来更新权重。
-
更优的模型。除了基础模型外,SDXL还包括一个额外的优化模型,该模型在与基础模型相同的潜在空间上。但该模型仅在噪声调度的前20%期间在高质量图像上训练。这意味着它知道如何将带有少量噪声的图像转换为高质量的纹理和细节。
由于原始Stable Diffusion是开源的,其他研究人员和开源社区已经探索了许多这类技术。SDXL结合了这些想法,实现了图像质量的显著提升,但运行模型的速度较慢且占用更多内存。我们的主要收获是,我们讨论的原则(特别是条件化)是引导生成模型行为的优秀通用工具,而开源发布可以加速探索。
博采众长:注释采样循环
现在我们知道每个组件的作用了,下面将它们结合起来生成图像,不再依赖于管道。以下是我们要使用的配置:
# Some settings
prompt = [
    "Acrylic palette knife painting of a flower"
]  # What we want to generate
height = 512  # default height of Stable Diffusion
width = 512  # default width of Stable Diffusion
num_inference_steps = 30  # Number of denoising steps
guidance_scale = 7.5  # Scale for classifier-free guidance
seed = 42  # Seed for random number generator
第一步是对文本提示进行编码。由于计划进行无分类器引导,我们将创建两组文本嵌入:一组是提示词嵌入,另一组代表空字符串,即无条件输入。尽管这里我们会使用无条件输入��,这一配置提供了很大的灵活性。例如,我们可以:
- 编码反向提示词替换空字符串。添加反向提示词可引导模型避免朝某个方向生成。在本章的练习6中,读者将会尝试使用反向提示词。
- 组合多个不同权重的提示词。提示词权重让我们可以强化或弱化提示词的某些部分。
# Tokenize the input
text_input = pipe.tokenizer(
    prompt,
    padding="max_length",
    max_length=pipe.tokenizer.model_max_length,
    truncation=True,
    return_tensors="pt",
)

# Do the same for the unconditional input (a blank string)
uncond_input = pipe.tokenizer(
    "",
    padding="max_length",
    max_length=pipe.tokenizer.model_max_length,
    return_tensors="pt",
)

# Feed both embeddings through the text encoder
with torch.no_grad():
    text_embeddings = pipe.text_encoder(text_input.input_ids.to(device))[0]
    uncond_embeddings = pipe.text_encoder(uncond_input.input_ids.to(device))[0]

# Concatenate the two sets of text embeddings embeddings
text_embeddings = torch.cat([uncond_embeddings, text_embeddings])
接下来,我们创建随机初始潜在表示并配置调度器来使用期望的推理步数:
# Prepare the Scheduler
pipe.scheduler.set_timesteps(num_inference_steps)

# Prepare the random starting latents
latents = (
    torch.randn(
        (1, pipe.unet.config.in_channels, height // 8, width // 8),
    )
    .to(device)
    .half()
)
latents = latents * pipe.scheduler.init_noise_sigma
然后遍历采样步骤,获取每个阶段的模型预测并用其更新潜在模型:
for i, t in enumerate(pipe.scheduler.timesteps):
    # Create two copies of the latents to match the two text embeddings (unconditional and conditional)
    latent_model_input = torch.cat([latents] * 2)
    latent_model_input = pipe.scheduler.scale_model_input(latent_model_input, t)

    # Predict the noise residual for both sets of inputs
    with torch.no_grad():
        noise_pred = pipe.unet(
            latent_model_input, t, encoder_hidden_states=text_embeddings
        ).sample

    # Split the prediction into unconditional and conditional versions:
    noise_pred_uncond, noise_pred_text = noise_pred.chunk(2)

    # Perform classifier-free guidance
    noise_pred = noise_pred_uncond + guidance_scale * (
        noise_pred_text - noise_pred_uncond
    )

    # Compute the previous noisy sample x_t -> x_t-1
    latents = pipe.scheduler.step(noise_pred, t, latents).prev_sample
注意无分类器引导步骤。我们的最终噪声预测是 noise_pred_uncond + guidance_scale * (noise_pred_text - noise_pred_uncond),将预测从无条件预测推向基于提示的预测。试着改变引导比例,看下输出会受何影响。
到循环结束时,潜在表示应该会展现一个符合提示词的图像。最后一步是使用VAE将潜在表示解码成图像,以便我们看到结果:
# Scale and decode the image latents with the VAE
latents = 1 / vae.config.scaling_factor * latents
with torch.no_grad():
    image = vae.decode(latents).sample
image = (image / 2 + 0.5).clamp(0, 1)

show_image(image[0].float())
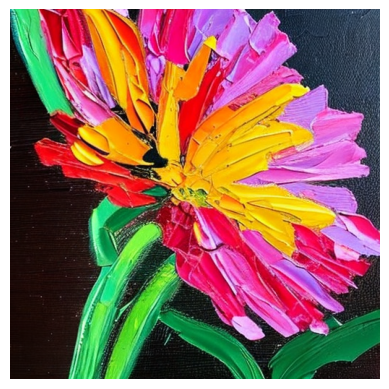
如果阅读StableDiffusionPipeline的源代码,会发现以上代码与管道使用的call()方法非常相似。希望注释版本能展示幕后并没有什么神奇的事情。在遇到添加了各种技巧的其他管道时,可以将其作为参考。
开放数据,开放模型
LAION-5B数据集包含超过50亿个图像URL及其相应的描述(图像-描述对)。这个数据集首先从CommonCrawl(一个类似Google搜索引擎索引互联网的开放网络爬取数据存储库)中获取所有图像URL,然后使用CLIP只保留文本与图像高度相似的图像-描述对。
这个数据集由开源ML社区创建,旨在满足开放访问此类数据集的需求。在LAION计划之前,只有少数大型公司的研��究实验室能够获取图像-文本对数据集。这些组织将数据集的详细信息保密,使其结果无法验证或复制。通过创建一个公开可用的URL和描述索引源,LAION使得许多小型社区和组织能够训练模型并进行研究,这在以前是不可想象的。
潜在扩散模型就是这样一种模型,由CompVis使用4亿个图像-文本对的旧版LAION数据集训练。基于LAION训练的潜在扩散模型的发布首次为整个研究社区提供了强大的文生图模型。
注:CompVis当前是海德堡大学的计算机视觉小组,为LMU Munich的研究小组 https://github.com/CompVis
潜在扩散的成功展示了这种方法的潜力,在后续产品Stable Diffusion中得到了实现,它是CompVis与当时两家初创公司Stability AI和Runway ML的合作。训练类似SD的模型需要大量的GPU时间。即使利用免费的LAION数据集,也只有少数人能够承担GPU小时的投入。这就是为什么模型权重和代码的公开发布如此重要——它首次提供了一个功能强大的文生图模型,具有与最佳闭源产品类似的能力。
Stable Diffusion的公开可用性使其成为过去几年中研究人员和开发人员探索这一技术的首选。数百篇论文在基础模型上进行构建,添加了新功能或找到了改进速度和质量的创新方法。除了研究论文之外,一个不一定来自机器学习背景的多样化社区一直在使用这些模型进行新创意工作流的探索,优化以实现更快的推理等等。无数初创公司已经找到了将这些快速改进的工具整合到其产品中的方法,形成了一个新的应用生态系统。

Stable Diffusion发布后的几个月展示了在公开环境中共享这些技术的影响,更多进一步的质量改进和定制技术将在第7章和第8章中进行探索。SD的质量与当时的商业产品(如DALL-E和MidJourney)也有的拼,成千上万的人着力使其变得更好,并在这个开源的基础上进行构建。希望这个例子能鼓励其他人效仿并与开源社区分享他们的工作。
注:除了用于训练Stable Diffusion,LAION-5B还被许多其他研究项目使用。比如OpenCLIP,这是LAION社区的一项努力,旨在训练高质量(最先进)的开源CLIP模型并复制类似原始模型的质量。高质量的开源CLIP模型对许多任务有益,如图像检索和零样本图像分类。训练模型数据的透明度也使得研究扩大模型规模的影响、正确复现结果以及使研究更易于访问成为可能。
LAION组织和数据集对推动研究和增强开源社区中的实验具有巨大的影响。然而,基于这些模型的文本到图像生成模型和下游商业应用的巨大成功引发了对这些数据集数据来源的担忧。
因为该数据集包含从互联网上爬取的图像链接,其中包含数百万指向可能包含受版权保护的材料(如照片、艺术作品、漫画、插图等)的URL。研究还发现,这些数据集还包括私人敏感信息,如公开可用的个人医疗影像。
注:2022年在Stable Diffusion于发布后不久出现了相关的文章 - https://arstechnica.com/information-technology/2022/09/artist-finds-private-medical-record-photos-in-popular-ai-training-data-set/
使用这样的数据集来训练生成式AI模型还可能使模型具有生成内容的能力,这些内�容会强化或加剧社会偏见,并可能用于生成显式成人内容。然而,这些开源模型是基于开源数据集训练的,因此可以研究、分析和缓解这些偏见和问题内容。
尽管一些国家对于研究用途的版权法有合理使用豁免,其他国家在使用抓取数据来训练机器学习模型方面也有利的先例,但当一个研究模型被用于商业级的大规模生成AI时会发生什么?这个复杂的话题目前正在美国和欧洲不同司法管辖区的法院进行诉讼,涉及的角度包括版权法、研究应用的合理使用、隐私、AI工具对创意工作的经济影响等。对此类复杂问题我们没有答案,但这种法律灰色地带正在推动研究和开源社区远离使用开源数据集;对于Stable Diffusion XL,用于训练的数据集并未披露,尽管模型权重是开源的。
构建一个以同意、安全和许可为中心的新大规模文本-图像数据集也将是研究和开源社区的优质资源,并为下游商业应用提供法律保障。
项目:用Gradio构建一个交互式机器学习演示
截至目前,我们专注于使用开源库运行transformer和扩散模型。这给我们带来了很多灵活性和对模型的控制,但也需要大量工作来配置运行。现实是大多数人不懂编程,但可能对探索模型及其功能感兴趣。
在这个项目中,我们将构建一个简单的机器学习演示,允许用户使用Stable Diffusion根据文本提示词生成图像。演示可轻松地向众多用户展示模型,使我们的工作和研究更易于访问。我们将使用Gradio开源库构建演示,该库可创建简单的web应用并使用Python进行自定义。
Gradio可以在很多地方运行,如Python IDE、Jupyter notebook、Google Colab或云环境如Hugging Face空间等。构建Gradio演示的最简单方法是使用其Interface类,它有三大关键点:
inputs:演示的预期输入类型,如文本提示词或图像outputs:演示的预期输出类型,如生成的图像fn:用户互动时调用的函数。这是魔法产生的核心。可以在这里运行任意代码,包括使用transformers或diffusers运行模型。
来看一个例子:
import gradio as gr


def greet(name):
    return "Hello " + name


demo = gr.Interface(fn=greet, inputs="text", outputs="text")

demo.launch()
# TODO: replace this with an image
Running on local URL:  http://127.0.0.1:7860

To create a public link, set `share=True` in `launch()`.
<IPython.core.display.HTML object>
轮到读者实操了!构建一个简单的演示,让用户可使用Stable Diffusion通过文本提示词生成图像。可以使用前一节的初始代码。演示运行起来后,建议添加更多功能使其更具交互性和趣味性。例如,你可以:
- 添加一个滑块来控制引导比例
- 添加一个按钮,允许用户上传自己的图像并从中生成新图像
- 添加一个标题和描述,让用户了解演示的内容
总结
本章展示了条件控制如何为我们提供新的方式来控制扩散模型生成的图像。我们已经看到了文本编码器如何让扩散模型通过文本提示词进行条件控制,从而实现强大的文生图功能。通过深入研究采样循环,我们探索了所有这些如何在Stable Diffusion模型中组合在一起,并了解了不同组件如何协同工作。
在第7章,读者将学习如何微调Stable Diffusion,为模型添加新知识或能力。例如,通过展示你的宠物的照片,Stable Diffusion可以学习到“your pet”的概念,并在新的场景中生成新的图像,例如“your pet on the moon”。
稍后,在第8章,我们将展示一些可以添加到扩散模型中的功能,使其不仅是简单的图像生成。例如,我们将探索图像修复,可以掩盖图像的一部分然后填充该部分。第8章还探讨了基于提示词编辑图像的技术。
练习
-
类条件扩散模型的训练过程与非条件模型的训练过程有何不同,特别是在输入数据和使用的损失函数方面?
-
时间步嵌入如何影响扩散过程中的图像质量和演变?
-
说明潜在扩散和普通扩散的区别。使用潜在扩散有哪些利弊?
-
文本提示词是如何融入模型的?
-
基于模型的引导和无分类器引导有什么区别?无分类器引导的好处是什么?
-
使用��反向提示词有什么效果?用
pipe(…, negative_prompt=““)进行试验。如何能够使用Stable Diffusion来引导图像? -
假设想从所有生成的图像中去除白色帽子。如何使用反向提示词来实现这?尝试使用高级管道并调整端到端推理示例(提示:这只需要修改无分类器条件的随机部分)。
-
在SDXL中,如果使用
(256, 256)而不是(1024, 1024)作为“原始尺寸”条件信号,会发生什么?如果使用(0, 0)以外的裁剪坐标,会发生什么?你能解释为什么吗?
挑战 -
蓝色引导。假设我们希望生成的图像偏向特定颜色,例如蓝色。如何做到这一点?第一步是定义一个我们想要最小化的条件函数,本例中是一个颜色损失。
def color_loss(images, target_color=(0.1, 0.5, 0.9)):
    """Given a target color (R, G, B) return a loss for how far away on average
    the images' pixels are from that color."""
    target = (
        torch.tensor(target_color).to(images.device) * 2 - 1
    )  # Map target color to (-1, 1)
    target = target[
        None, :, None, None
    ]  # Get shape right to work with the images (b, c, h, w)
    error = torch.abs(
        images - target
    ).mean()  # Mean absolute difference between the image pixels and the target color
    return error
根据这一损失函数,编写一个采样循环(无需训练),修改损失函数中的
x。为简化工具,推荐使用上一章中的无条件DDPMPipeline。